Category Archives: Azure
Now Working With Azure Without Leaving Visual Studio!
First, let me say I love what they have done with the Windows Azure user interface on the web. (You can see it here.) The UI is easy to get around, the animations are helpful, etc. Unfortunately, it’s all in the browser and not in my IDE. This means I have to leave my IDE on occasion to do things like publish my app and confirm the names of sites, services, databases, etc.
But times are a changin’! On April 30th, Microsoft released the Windows Azure SDK 2.0 for .NET. This SDK includes enhancements to Visual Studio that provide integration between the IDE and the Azure management services. In this blog post, I’m going to focus on the publishing to Azure features, but there are other features enabled with this SDK that you can read a little more about on Scott Guthrie’s blog post here.
As I have in the past, I’m going to start by right-clicking my web project and selecting Publish… from the context menu.

Again, as before, the Publish Web dialog appears and we’ll click the Import… button to open the Publish Profile dialog.

I used to download my Azure publish profile from the management portal and keep that file in my Visual Studio project, so I could re-use it if I needed to and share it with my team. I would then import it using this dialog. Here comes the new part! Rather than browsing to the file, I’m going to select the first radio button, labeled Import from a Windows Azure web site, and click the Add Windows Azure subscription hyperlink.

The Import Windows Azure Subscriptions dialog appears. We need to download our subscription details, so click Download subscription file to get the .publishsettings file from the portal. This is the only time you’ll need to return to the Azure portal. This settings file includes all of the information about our Azure subscription – not just a single web site’s publish settings. We’ll then return to the Import Windows Azure Subscriptions dialog and browse out to the location of the file we downloaded. Click the Import button to continue.

Returning to the Import Publish Profile dialog, you should be able to select from your existing Azure web sites from the drop down list. Click OK to return to the Publish Web dialog. The publish settings will auto-populate the Connection tab (which is way better than trying to enter/re-enter all of this stuff yourself). If you’d like, you can click Validate Connection to ensure everything is correct.

The rest of the publish process remains unchanged. After clicking the Publish or Close buttons, you will be prompted to save all of your publish settings and if you choose to do so, they will be added to your Visual Studio project under Properties | PublishProfiles.
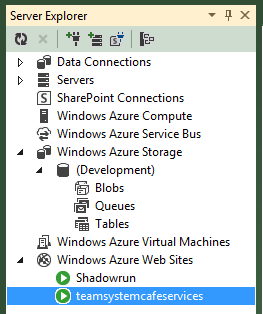
Now that I’ve published my application, I should probably check on its status. By opening Server Explorer in Visual Studio, you can now see your Azure subscription services. By expanding the Windows Azure Web Sites node, I can see that my teamsystemcafeservices site is running.
There are several useful options available if you right-click your web site. I can start and stop the web site and stream logs to my output window.

Of course, I can save myself the trip out to the management portal again by selecting View Settings and configure my web site right within the IDE.

There are several other features in the new Azure SDK, so check ’em out!
Another Chance to Win Stuff! The Cloud Challenge
Build your very own Virtual Network in the Cloud for FREE with the Windows Azure cloud platform, and Enter for a chance to win one of the following fantastic prizes:
- One Grand Prize: Ticket to Tech Ed 2013 North America in New Orleans, LA ( $2,195 retail value ) PLUS a $500 VISA Gift Card.
- Two First Prizes: One of two Microsoft Surface Pro devices ( $899 Retail Value )
- Twenty-Five Second Prizes: One of twenty-five Microsoft Certification Exam Vouchers ( $150 Retail Value )
You could win a ticket to Microsoft TechEd 2013, a Microsoft Surface Pro or Certification Exam Voucher!

But Wait! There’s More!
In addition to a chance to win one of the prizes above, EVERY ENTRANT will receive up to 750 compute hours and up to 35GB cloud storage to use as you’d like each month for 90-Days as part of the Windows Azure free trial program.
How To Enter the “Cloud Challenge”
You can enter the Microsoft TechEd “Cloud Challenge” Sweepstakes by completing all of the THREE EASY TASKS below to activate a Windows Azure FREE 90-Day Trial Account ( no subscription obligation or fees required ) and build your Virtual Network in the Cloud. Be sure to complete the last task to submit your proof-of-completion for entry into this sweepstakes.
- Entries must be received between April 1, 2013 and April 30, 2013 to be eligible. One entry per individual.
- This contest is open to all IT Professionals Age 18 and over that are legal residents of the United States.
- Estimated Completion Time: 15-20 minutes
TASK 1 – Activate a FREE Windows Azure 90-Day Trial
Activate a FREE Windows Azure 90-Day Trial Account to receive up to 750 compute hours and up to 35GB cloud storage to use as you’d like each month for 90-days. After the free 90-day period ends, there is absolutely no obligation required for a paid subscription.

DO IT: Activate a FREE Windows Azure 90-Day Trial
NOTE: When activating your FREE Trial for Windows Azure, you will be prompted for credit card information. This information is used only to validate your identity and your credit card will not be charged, unless you explicitly convert your FREE Trial account to a paid subscription at a later point in time.
TASK 2 – Build your Virtual Network in the Cloud
Virtual Networks on the Windows Azure Cloud Platform allow you to define a predictable set of virtualized IP subnets upon which you can place one or more Virtual Machines running Windows Server 2012, Windows Server 2008 R2 and Linux. You can even securely connect a Windows Azure Virtual Network to your on-premise environment via a Site-to-Site IPsec VPN tunnel to leverage Windows Azure as a remote datacenter for disaster recovery, online backup, pilots, migrating applications … and MORE!
Complete the steps in this task to sign-in to the Windows Azure Management portal and quickly provision a new Virtual Network in the cloud.
- Sign-in to the Windows Azure Management Portal with the Microsoft account credentials used in the prior task to activate your free 90-day trial.
- On the bottom toolbar, click the +New button, then select Network | Virtual Network | Quick Create.

Creating a Virtual Network using Quick Create
- On the Quick Create form, complete the following fields of information:
– Name: xxxlabnet01 ( where “xxx” is replaced by your initials ).
– Address Space: 10.—.—.—
– Maximum VM Count: 4096 [CIDR: /20]
– Affinity Group / Region: East US
– Connect to Existing DNS Server: None
– Subscription: 3 Month Free Trial
Virtual Network Quick Create Form
Click the Create A Virtual Network button to create your new Virtual Network on the Windows Azure Cloud Platform!


Congratulations! You now have a new virtual network that you can use to connect multiple virtual machines together on the Windows Azure Cloud Platform. Learn more about using your new Virtual Network with our FREE Online Training at http://aka.ms/AzureVMTraining.
TASK 3 – Submit Proof-of-Completion
Complete the steps in this task to submit your proof-of-completion entry into the Microsoft TechEd “Cloud Challenge” Sweepstakes for a chance to win one of the exciting prizes listed above.
- Sign-in to the Windows Azure Management Portal with the Microsoft account credentials used in the prior task to activate your free 90-day trial.
- On the Windows Azure Management Portal page, click on the ALL ITEMS link on the left navigation panel.

Windows Azure All Items Page - Press the PrtScn ( Print Screen ) function key on your keyboard to copy an image of this page to your PC clipboard.
- Click on THIS LINK to create a new email message addressed to the sweepstakes team at CloudChallenge@microsoft.com
- IMPORTANT: In the body of the email, include this exact text:
“I’ve completed the Microsoft TechEd Cloud Challenge for Windows Azure Virtual Networks.” - IMORTANT: Paste the image copied in Step 3 into the body of the new email message created above.
- Click the Send button in your email client to submit the email message as your proof-of-completion and sweepstakes entry.

Upon submitting your entry, you will receive a confirmation email within 24-hours.
COMPLETED! Want more?
Now that you’ve built your Windows Azure Virtual Network in the cloud, start leveraging it with these additional free learning resources.
- Want to learn more about Windows Azure Virtual Machines and Virtual Networks?
- Want to learn more about Windows Server 2012? Become our next “Early Expert”!
- Want to learn more about our FREE Hyper-V Server 2012?
